 So
much for the line of thought around this latest project at the House
of Davenport. Now, for the details behind this geared Corvair engine
that some of you saw run during this year's Convention at Oshkosh.
So
much for the line of thought around this latest project at the House
of Davenport. Now, for the details behind this geared Corvair engine
that some of you saw run during this year's Convention at Oshkosh.This article is being written at the request of Jack Cox of FAA Headquarters concerning a layman's viewpoints and experience in developing a geared engine for use in a homebuilt airplane.
This approach was taken by the writer for two reasons. First off, the need for a cheap, reliable, engine for the smaller homebuilt airplane is evident. So much so, in fact, that the sixty five horsepower Continental and Lycoming engines of the late forties are getting scarce as hen's teeth.
When you do find one, hang onto your hat if a little item like a crankshaft or some cylinders are needed to bring the thing back into useable limits. We have all heard the stories about the "cheap", "zero since major" engine that comes up with an out of limits.015" oversize cylinder with the standard piston and rings installed. Result? Low power output, oil consumption right up there with fuel consumption, and a very disgusted EAA'er who spent some bread and got very little for his dollar.
The second reason stated quite simply is, "Why not?" Why not try to come up with a light, reliable, air cooled automotive type engine, converted to aviation use? We went this way back in the early thirties with the Model A Ford engine, and the Heath motorcycle engine and even had a Ford V 8 in a certified airplane, the Aero Sport.
When I was a kid back in Auburn, Indiana we had an Aero Sport on the field. The smooth running engine was a tribute to the design, and while at the time I was too young to get to fly behind the thing, it always looked and sounded impressive. How did it fly? I don't remember any of the gory details. Perhaps some of you older members have flown that machine, but it did fly.
So
much for the line of thought around this latest project at the House
of Davenport. Now, for the details behind this geared Corvair engine
that some of you saw run during this year's Convention at Oshkosh.
Shortly after becoming involved in the building of a Faker Fokker with Bob Ladd and the rest of the Waffel Staffel, I was confronted with what engine to hang on the firewall. Wayne Carstens had grabbed off a wrecked Champ and had a good 65 h.p. Continental, John Beetham had a good 85 and so did Bob. Mike Nolan had no engine, nor did Ron Scott .
Or Roger Dee.
And so Roger, who has five kids, a mortgage, a car payment, and over the road expenses that are out of sight, with some reservation turned once again to the pages of Sport Aviation and read and re read Bud Rinker's account of his turbo charged 'vair engine with increasing interest.
I hied myself off to a local salvage yard, and upon stating my demands for a Corvair engine of undetermined lineage, was confronted with a grunt, a gutteral, "Corvair, huh? " . . . followed by the question, "How many do you want?"
"How many you got?" was a somewhat intelligent reply to this question, I thought, and upon being informed that he had as many as I wanted, I thought, "Why not take six?", which I did for the sum total of seventy five dollars! That's right, friend two for a quarter. Scrap prices. Hot dog! Cheap engines!
As is, where is, but out, pick of the litter and all that other good stuff. I ran to the pile, rolling engines over (there were ten or twelve of them). No turbo charged jobbies, but this one looks alright ... and this one is O.K. ... this one doesn't have a fuel pump or generator, but it looks O.K. And so on until the six were picked out and loaded one by one into the utility trailer which I had thoughtfully built for a portable test stand (and trips to the town dump).
Teardown of the first one off the trailer showed a swallowed valve, two rods out, bad crank and all sorts of other very bad stuff. But the engine was running when the car was junked! So when you are told to tear one down completely, please do so because there can be real trouble in the innards and the thing will still purr along.
The case of this engine was saved, along with push rods, valve train components and other related hardware. Still undaunted (even though Momma kind of snorted, especially at all that oil on the floor in the garage) number two was torn into.
No. 5 rod was out, lots of metal in the sump, and that's about all that could be found wrong with it, so this engine (number T 0209ZF) was torn down completely, vapor cleaned and shell blasted, magnafluxed and Zygloed. This turned out to be a 1963, 145C.I.D. Engine with Corsa heads.
Actually I'm getting a little bit ahead of myself here. After teardown and prior to any extensive clean up of parts, all parts were inspected for outof limits tolerances as described in Chilton's book on Corvair rebuild. This book was purchased from J. C. Whitney in Chicago and is a real "bible" on Corvair work. Especially since the time span from tear down to run up was two years and the fact that I had forgotten how the thing came apart!
But service limits are spelled out in the book, just as in an aircraft engine service manual and much to my surprise everything checked out good except the No. 5 crank throw which was cleaned up with an.010" regrind. So, for eighteen dollars I had a serviceable crank with standard undersized rods and mains, and a straight crankshaft.
Cylinders were straight and a simple re hone job was all that was required here. In Zyglo I lost one piston due to a sand hole from the top ring land through the skirt to the wrist pin hole.
On valve refacing, one exhaust valve was replaced due to a razor edge that I didn't like. The Valve guides should have been replaced since they were on the very high side of service limits but for test purposes they were retained and will be replaced before the engine is flown.
In short, a complete aircraft inspection and assembly procedure was followed on the build up with ring butt clearances and groove side clearances being checked and so on. I was pleased and surprised to have only one upper ring fit it's groove with the maximum of .004" side clearance.
Sealed power cast iron rings were installed and no adjustment was required on any of the rings as far as butt clearance was concerned.
The engine was reassembled using Plasti Gauge material to check the cam journal/case clearances and again, to my surprise, everything was right in the middle of service limits here. Bob Ladd had to have his case reworked at El Reno because of a scuffed bearing surface, but Roger Dee pasted his together with no problem.
A modified induction system was made up from exhaust pipe tubing and an aircraft carburetor was used since the idea of trying to keep two carbs in sync on either side of an engine that is twenty four inches wide didn't appeal to this old hot rodder one little bit. Plus, it would result in a much cleaner cowl line if this was done. So this is the way I went.
Stock Corvair ignition was used with the vacuum advance removed, the lead plate pinned in position and twelve degrees before top deadcenter timing was established. Centrifugal advance was set to limit at eighteen degrees and adjusted to come in at twenty four hundred RPM.
So much for the "niceties" of the actual rebuild of the Corvair engine. Summing this area up: BY ALL MEANS tear the engine down completely, and magna flux the crankshaft, push rods, connecting rods, wrist pins, and all the other steel parts that jiggle and jump and whirl around. It's cheap insurance and you are foolish if you don't, since you won't have the piece of mind that comes with KNOWING that at the time of assembly everything is sound.
All aluminum parts should be Zyglo inspected for the same reason. Case, cam gear, pistons, valley cover and so forth should be checked for cracks. Some noncritical cracks were apparent around shroud screw holes, etc. In the case I used in this engine.
Now for the conversion to a geared engine:
I purchased Bud Rinker's drawings and they came post haste. They were found to be a very good quality with only one small error apparent. The decimal point was in the wrong place for the thickness of the spacer to be used in place of the brake backing plate on the VW unit. Being an avid EAA'er I simply cut the needed part from the backer plate and used it!
Enough aluminum was purchased from a steel warehouse in Chicago for two conversions since there was a fifteen dollar shearing charge to be paid anyway. Total outlay for this material was seventy five dollars. I understand that Bud offers required material for approximately forty dollars so the price I paid wasn't too tough after all.
The machine work was done on a Bridgeport Mill. This is one area that can be very discouraging to you. Machine shops in the area around Milwaukee charge anywhere from ten to fifteen dollars per hour for this type of work, and after taking the drawings to a number of places I wound up with' a quote of one hundred and seventyfive dollars for one set of adaptor plates, or roughly seventeen hours of work.
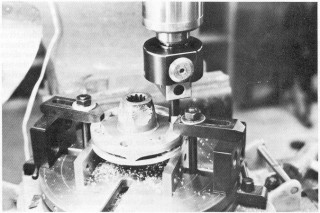 I
was fortunate enough to have a true friend in one Bob Harkness who
has been involved with airplanes since he was a kid. He offered the
use of his abilities and his basement with the Bridgeport Mill on a
very limited part time basis. So on some of those long, wet, dreary
winter Saturdays that Wisconsin is so famous for, we carved the
adaptor plates out per drawing and fitted them to the case after
installing the crankshaft temporarily.
I
was fortunate enough to have a true friend in one Bob Harkness who
has been involved with airplanes since he was a kid. He offered the
use of his abilities and his basement with the Bridgeport Mill on a
very limited part time basis. So on some of those long, wet, dreary
winter Saturdays that Wisconsin is so famous for, we carved the
adaptor plates out per drawing and fitted them to the case after
installing the crankshaft temporarily.
We also turned out the stub shaft and bored the crankshaft to accommodate this. This stub shaft is actually the trans axle from the VW transmission to the reduction gear unit. The tolerances in this area are quite critical and we managed to press fit the crank and stub shaft after freezing the stub shaft, and pre heating the crankshaft to 450' in his wife's oven (while she was shopping!).
Bud's drawings call for a one quarter inch square key in this assembly, but we machined a hole for a quarter inch round key since Bob felt square corners could provide an area for stress concentration. This is the only difference from Bud's drawings.
Some thirty man hours later we had the two plates ready to install, and found that following Bud's procedure outline to the letter, things went together with a "clunk" that reminded me of the side plates on a MeyerDrake engine. Perfect fit, no errors encountered, and the assembly of this to the crankcase, and pre loading the gear train was accomplished prior to the complete reassembly of the engine.
Pre loading involves the use of Chevy differential shims and took me considerable time. Not having depth gages at my disposal, out with the old Plasti Gauge again and after removing and replacing the gear case some twenty times the correct combination of shims was found to give me the required .0008" clearance between the rear support bearing and the shims.
I have been asked about thrust loads by a lot of people. On the crankshaft proper there is none since all it is doing is turning the lower gear in the reduction unit. Unlike the direct drive Corvairs and VW's that are presently flying, there is no load placed on the thrust bearing faces. I did, however, use the later model Corvair main bearing with the face on both halves of the main bearing. Earlier Corvairs had a face on one half of the main bearing, and I would question the use of this model engine in a conversion of any sort.
Thrust on the prop shaft (hub driveshaft in the VW bus) is being carried by a very large ball bearing. Should a problem develop in this area, radial thrust bearings are available over the counter to handle this, however, before running out to your local SKF bearing dealer consider this: It's a cold, rainy night. The streets are very slippery. A heavily loaded VW van comes down your street, turns the corner, and skids into the curb. 'nuf said?
Lubrication for the unit has been a question asked me. The unit is lubricated with engine oil piped from the gallery lines within the case. (I picked mine up at the oil filter.) This oil is pumped at engine operating pressure to a nozzle I turned out of an aircraft bolt (copper broke!) and sprays directly onto the teeth as they mesh on the loaded side. It returns to the engine sump through a generous passage machined into the rear adaptor plate.
Oil temperature to date has been in the 180 190 range and after a 25 minute run the gear box temperature was only 145. These readings are all Fahrenheit. I ain't gone metric, yet!
The prop hub was "farmed" out and turned down from the VW brake hub. It had to be redone since the "spread" of the prop bolts had fanned six to seven degrees and wouldn't fit the prop. Bob Harkness again came to the rescue, and with the aid of "Mr. Miller", oversized holes were cut to true up the pattern on centers and then dowels a la Lycoming were turned down and pulled into the hub. The result was a satisfying clunk (with a little wiggling) of the borrowed 65 h.p. Continental prop. Thanks, Karl Schaarschmidt!
Know something? At this time we had a very official looking aircraft type engine sitting there staring back at me with a "Well?" expression on it's brightly painted cylinders.
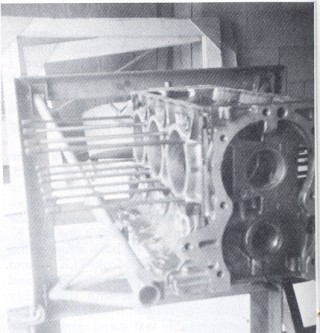
Tom Rawson, who had helped build the utility trailer with me, manufactured an engine mount as per Bernie Pietenpol's drawings for the Corvair installation in his bird, and a test stand was made up out of high tension tower angle iron. This whole mess was incorporated onto the bed of the trailer, and bolted down, with a fiftyfive gallon drum serving as a fuel tank.
Ram air cooling was decided upon for two reasons. First, to reduce overall engine weight, and secondly, to provide for a cleaner cowl line. As much as I hate TupperWare (ever try to get a piece of pie out of one of those pie boxes without getting it all over you?) I must say their bowls make delightful air scoops!
Momma saw me sitting at the kitchen table one evening, top shroud of the engine on my lap, tin snips in hand trying to work up some sort of a stove pipe hat configuration out of sheet aluminum and pop rivets.
She smiled at my futile efforts, went to the trash basket in the garage and pulled this bowl out that one of the kids had allowed to get too close to a burner on the stove the night before. Result? A hole in the side and bottom of the bowl. Throw away? Never. Not at our house!
A couple of passes with the tin snips, a quick move to the inverted position and lo! The thing fit the top of the shroud beautifully, replacing the ten pound blower assembly. A little aircraft epoxy and a couple of pop rivets, and onto the engine with the top shroud.
Four quarts of oil, six shots of prime, three blades of the prop (gee! This thing is tight), a quick check to make sure the trailer hitch was secure to the car, a cry for "Brakes and Cornflakes" to my son Joe, the pilot in this case... and nothing happened.
A quick recheck for continuity showed a wire hooked up wrong on the switch. Corrected, some more prime, a couple of blades of the prop, throttle cracked, and again a request for "Contact" and on the first pull of the prop she belched forth from No. 3 stack with a ball of black smoke, and kicked backwards in a most rewarding manner.
Removing my wristwatch, and preparing in other ways to do battle with this beast, another blade of the prop and another nothing. Switch off, and a quick repositioning of the propeller for a better pull, again "Contact" and she was running at fifteen hundred on the Stewart Warner electric tach. Oil pressure came right up to 40 psi and stayed there. After about three minutes I shut the thing down, and opened a can of beer.
The engine ran at Oshkosh some four hours and was taken there with only thirty minutes time on it. A very rich mixture was evident to those of you who saw it running, and this has since been corrected by replacing the needle valve and seat and readjustment of the float level.
Oil leaks that developed some four hours into the test period have since been corrected with the addition of a strut from the adaptor plates to the right (facing the engine) front cylinder. In his plans Bud indicates gyroscopic loads from the prop might cause the plates to shift despite the two quarter inch dowel pins through the plates into the engine case. Rather than install two braces as per his suggestion with resultant shadowing of cooling air flowing over the front cylinders this strut was placed in front of the baffling with no air flow disturbance.
The engine now has eleven hours on it, and I am well pleased with it's performance. It will swing the 72" x 49" wood prop 2150 rpm (static) and a 65 h.p. Engine will twist the same prop about 1950. So I would estimate the output on the engine to be somewhere in the vicinity of 72 to 75 h.p'
 These
figures have been compiled using the 1.40: 1. 0 reduction gear unit
as removed from an old VW bus. I know the 1.80:1.0 unit available
from VW would allow the engine to turn up faster than it's present
3,000 RPM. The engine is supposed to develop 90 h.p. At 4400 RPM.
These gears are available for around sixty dollars, so I haven't
bought "my" set yet.
These
figures have been compiled using the 1.40: 1. 0 reduction gear unit
as removed from an old VW bus. I know the 1.80:1.0 unit available
from VW would allow the engine to turn up faster than it's present
3,000 RPM. The engine is supposed to develop 90 h.p. At 4400 RPM.
These gears are available for around sixty dollars, so I haven't
bought "my" set yet.
Ray Hegy looked the thing over at Oshkosh and suggested I try a prop from a 150 h.p. Franklin as installed on the Stinson 108. He felt the longer diameter, increased blade area, and pitch coupled with the 1.80:1.0 ratio would result in a slow turning efficient installation that would haul the Fokker about the skies in a most amiable manner.
So there you have it. I'm no engineer, and I know very little about percussion, gear teeth loading, torque and all that other stuff. I DO know, however, I have a geared Corvair, that should weigh in at about 220 pounds in flying configuration, running in a quiet and businesslike manner. At a cost of $287.32 "as is" the engine cost less than T bones!
In looking over my credit card receipts, I find that I purchased thirty gallons of 80/87 gasoline, and after eleven hours running time there is still some fuel in the barrel. This has been at speeds from 850 RPM (idle) to maximum power setting of 3000 RPM.
Cylinder head temperatures are running from 200 to 220 since overhauling the carburetor. Jet size went up to a No. 49 to a No. 46 and with this and the readjustment of the float level, the mixture change resulted in a slight rise from the former 190. Guess the float must have been way off. This temperature is still well within the limits which Corvair says are 350.
1 have found that oil does make quite a difference. Best results to date have been obtained with Shell Rotella No. 50. Multi viscosity oils seem to cause a lot more frothing at the crankcase vent, and a gradual loss of oil pressure as the oil warms up.
Oil consumption has been nil since adding one quart twenty minutes running time after start up. The older model Harrison oil coolers are more efficient than the late model coolers, and I would recommend that you use one.
Oil temperature has never gone over 200 and seems to stay around 180 190 most of the time. Remember now, this engine runs full throttle part of the time and slip stream is only from the propeller. I would estimate this to be somewhere around sixty miles per hour, and in the airplane no problems are contemplated with either the head temperature or the cooling of the oil.
In flying configuration I plan on using one of the six quart, cast aluminum, finned sumps that are available from J. C. Whitney. It is a work of art, will add rigidity to the lower end of the case, increase total oil capacity fifty per cent, and is ribbed for even better cooling.
So there yuh be! Economical? I say! Reliable? I don't know yet. That's why we paint "Experimental" on the side of 'em! Fun? You betcha! Interesting? YES! And when you get right down to it, I guess that is what EAA is all about. You probably noticed me dropping a few names here and there in this article. Tom Rawson, Chapter 250 member, a welder and sooth sayer; Karl Schaarschmidt, Chapter 250 member, airport owner and provider of props; Bob Harkness, V/P of a major manufacturing company, sailplane proponent, engine developer, Sunday School teacher . . . I could go on and on about this man his enthusiasm, his dignity and his outlook on life. Quite a guy. Damon LaBlond, Chapter 250 member, Midget Mustang builder, and machinist in his own right.
Maggie Davenport: EAA member extraordinary. Keeper of the Budget that allows this type of "carrying on" to indeed carry on. Back rubber supreme, avid camper (at least at the Convention) and the one who puts up with all this grief.
Yes, we have ourselves quite an organization in this Experimental Aircraft Association. The talent that is represented at any chapter meeting is a vast storehouse of knowledge waiting to be tapped.
A serious thought in closing. We need engines desperately. I am in no way saying the Corvair engine is the answer to everyone's problem, but I felt before going into this project the little bear had a lot of potential. I know now that it has a great deal of potential, geared or direct drive. So while they are still available, let's get some of your ideas on a stand or in an airplane and see what develops.
My reward for all of this came early one evening this last year at Oshkosh when Joe pulled back the power to 1100 RPM prior to shut down, and the little lady sat there with a slight clatter coming from her gear train.
A Warbird member who had watched the run up stepped up to me, tapped me on the shoulder, nodded his head in her direction, smiled and said quite simply, "You got yourself a poor man's Merlin." Gee! I wish I had asked his name.
We have rotaries coming (not the Gnome!). We have snowmobile conversions to take a look at. Jim Bede gave us a jet to look at this year. We have the expertise needed. Some people will read this summary, smile, and say I'm all wet. Fine!
But I do have an engine. It is running. It hasn't stopped except when I wanted it to, so far, so ... why not?